
Assuming you have all the necessary parts and tools, installation of a dual exhaust system on a Chevy truck is not terribly difficult. However, there are a few things to keep in mind.
First, when cutting the factory exhaust, be sure to leave enough length so that the new dual exhaust can be routed correctly. Secondly, pay attention to the hangers and brackets when installing the new system – they need to be lined up correctly so that the exhaust does not rub or rattle. Finally, make sure all the connections are tight and secure before starting the truck – any exhaust leaks will cause serious problems.
With a little care and attention, installing a dual exhaust system on a Chevy truck can be a straightforward and relatively easy process.
1. Raise the truck up on jack stands so that you can work underneath it.
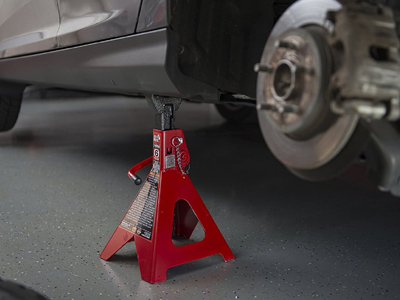
If you’re planning on doing any work underneath your truck, you’ll first need to raise it up on jack stands. This will give you the clearance you need to work, and will help prevent any injuries if you happen to drop something.
To raise your truck up on jack stands, first drive it onto a level surface. Then, place jack stands under the frame on either side. Once the jack stands are in place, slowly jack up the truck until the tires are off the ground.
Once the truck is raised, you can now work underneath it. Be sure to use caution, as there is always the risk of something falling on you. If possible, have someone else hold anything that you’re working on, just to be safe.
When you’re finished working, simply lower the truck back down and remove the jack stands. 50 Essential Tools For Jeep Wrangler.
2. Disconnect the existing exhaust system at the catalytic converter.

If your vehicle is equipped with a catalytic converter, you will need to disconnect the existing exhaust system at the catalytic converter. This is a simple process that can be done with a few tools.
First, locate the catalytic converter. It is typically located under the vehicle, near the muffler.
Next, use a wrench to loosen the bolts that secure the catalytic converter to the exhaust system.
Once the bolts are loose, you can remove the catalytic converter from the exhaust system.
Finally, install the new catalytic converter in the same location and secure it with the bolts.
3. Cut off the old muffler and tail pipe.

If your car is sounding a little louder than usual, it might be time to cut off the old muffler and tail pipe. This is a relatively easy process that anyone can do with a few simple tools.
First, you’ll need to jack up your car and support it on jack stands. Then, you’ll need to locate the muffler and tail pipe. The muffler is usually located near the back of the car, while the tail pipe is typically located under the car.
Once you’ve located both the muffler and tail pipe, you’ll need to cut them off. You can use a hacksaw, power saw, or any other type of cutting tool. Just be sure to wear safety goggles and gloves to protect yourself from flying debris. Easy to install car seat covers.
Once you’ve cut off the old muffler and tail pipe, you can install the new ones. Simply reverse the process you used to remove the old parts.
If your car is sounding a little louder than usual, it might be time to cut off the old muffler and tail pipe. This is a relatively easy process that anyone can do with a few simple tools.
First, you’ll need to jack up your car and support it on jack stands. Then, you’ll need to locate the muffler and tail pipe. The muffler is usually located near the back of the car, while the tail pipe is typically located under the car.
Once you’ve located both the muffler and tail pipe, you’ll need to cut them off. You can use a hacksaw, power saw, or any other type of cutting tool. Just be sure to wear safety goggles and gloves to protect yourself from flying debris.
Once you’ve cut off the old muffler and tail pipe, you can install the new ones. Simply reverse the process you used to remove the old parts.
4. Install the new mufflers and tail pipes.

Installing new mufflers and tail pipes can be a simple process if you have the right tools and know-how. First, you’ll need to remove the old mufflers and tail pipes. To do this, you’ll need a socket wrench and an extension. Once the old mufflers and tail pipes are removed, you’ll need to clean the area around the exhaust tips. This will help ensure a tight seal when you install the new mufflers and tail pipes.
Next, you’ll need to install the new mufflers and tail pipes. To do this, you’ll need to line up the exhaust tips with the holes in the mufflers and tail pipes. Once the exhaust tips are lined up, you’ll need to use the socket wrench and extension to tighten the bolts. Be sure to tighten the bolts evenly so that the mufflers and tail pipes are secure.
Finally, you’ll need to test the new mufflers and tail pipes to make sure they’re working properly. To do this, you’ll need to start the engine and let it idle for a few minutes. If you hear any strange noises, or if the exhaust tips are leaking, you’ll need to adjust the mufflers and tail pipes accordingly.
5. Connect the new exhaust system to the catalytic converter.
Assuming you have all the parts and tools you need, the process of connecting a new exhaust system to the catalytic converter is relatively straightforward. The first step is to remove the old exhaust system. This is usually done by unbolting it at the points where it connects to the engine and the catalytic converter.
Once the old system is removed, you can install the new one. To do this, you will need to connect the new system to the exhaust manifold at the engine, and then connect it to the catalytic converter.
In most cases, the new system will come with bolts and gaskets that you will need to use to make the connection. Once everything is bolted in place, you can start the engine and test the new system.
6. Lower the truck off of the jack stands and take it for a spin.

If you’ve ever taken your truck off-roading, then you know the importance of having a good suspension system. But what if you don’t have the money to buy a new truck or upgrade your existing one? Well, you can always lower your truck to give it a better stance and improve its handling.
Lowering your truck will also give it a more aggressive look, which can be a major selling point if you’re trying to sell it. But more importantly, it will improve the truck’s aerodynamics, making it more efficient and improving its fuel economy.
So, how do you lower your truck? It’s actually quite simple. First, you’ll need to jack up your truck and support it on jack stands. Once it’s securely in place, remove the wheels and tires.
Next, you’ll need to remove the shocks and coil springs. Once they’re out, you can lower the truck to the desired height. Keep in mind that lowering your truck too much can adversely affect its handling, so don’t go too crazy.
Once you’re happy with the new height, you can reinstall the shocks and coil springs. Then, put the wheels and tires back on and lower the truck off of the jack stands.
Take it for a spin and enjoy the new look and improved performance of your lowered truck.
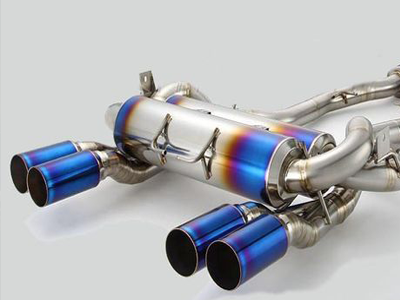
Step by Step Installation of a Dual Exhaust on a Chevy
If you’re looking to beef up your Chevy’s sound and performance, then a dual exhaust system is a great way to do it. Not only will it give your Chevy a deep, throaty growl, but it will also help improve its performance. Installing a dual exhaust system is a pretty straightforward process, and in this article, we’ll show you how to do it step-by-step.
Before you get started, you’ll need to gather a few tools and materials. You’ll need a hacksaw, a drill, a drill bit, a socket wrench, a ratchet, and a set of metric wrenches. You’ll also need a dual exhaust kit, which you can purchase at your local auto parts store.
Once you have everything you need, you can start the installation process. The first step is to remove the old exhaust system. To do this, you’ll need to use the socket wrench to remove the bolts that are holding the system in place. Once the bolts are removed, you can pull the old system off.
With the old system removed, you can start installing the new one. The first step is to connect the pipes that come with the kit to the headers. You’ll need to use the metric wrenches to do this. Once the pipes are connected, you can start attaching the mufflers.
The next step is to connect the pipes to the mufflers. You’ll need to use the drill to make holes in the pipes so that you can attach the mufflers. Once the mufflers are in place, you can attach the tips.
The final step is to test-fit the system to make sure everything fits properly. Once you’re satisfied that everything fits, you can drill holes and bolt the system in place.
And that’s it! You’ve now successfully installed a dual exhaust system on your Chevy.
Setp 1. The Right Dual Exhaust

Assuming you have a Chevy and want to install a dual exhaust, there are a few things you need to know first. Dual exhausts are not a one size fits all installation, so you’ll need to do some research to find the right system for your car.
There are many different types and styles of dual exhausts, so you’ll need to find one that fits your Chevy’s specifications. You’ll also need to determine where you want the exhaust tips to be located. Once you have all of this information, you can begin the installation process.
The first step is to remove the old exhaust system. This includes the muffler, catalytic converter, and any other exhaust components. You’ll need a saw or some other cutting tool to remove the old exhaust. Next, you’ll need to measure the length of the new dual exhaust. It’s important to get the measurements right so that the new exhaust will fit properly. Once you have the new exhaust, you can begin the installation process.
Start by attaching the hangers to the new exhaust. Then, slide the new exhaust into place and bolt it down. Be sure to use the proper size bolts and to tighten them down snugly. Next, connect the exhaust tips. You’ll need to use a wrench to tighten the clamps that hold the tips in place. Finally, start the engine and listen for any leaks. If you hear any, tighten the bolts and clamps until the leaks stop.
Step 2. Lift the Truck
If you have a Chevy and want to install a dual exhaust, you will need to lift the truck. This is not a difficult task, but it is important to follow the directions carefully.
First, you will need to find a place to lift the truck. You can use a garage or a driveway. Make sure that the surface is level and there is nothing in the way that could obstruct the process.
Next, you will need to jack up the truck. Place the jack under the frame of the truck and slowly lift it until the tires are off the ground.
Once the truck is lifted, you can remove the old exhaust system. Start by disconnecting the exhaust pipes from the muffler. Then, remove the bolts that hold the muffler in place.
Now, you can install the new dual exhaust system. Start by connecting the exhaust pipes to the new muffler. Then, bolt the muffler in place.
Finally, lower the truck and test the new exhaust system. Make sure that there are no leaks and that the sound is to your liking.
Step 3. Install the Exhaust Part

If you have a Chevy and you want to install dual exhaust, there are a few things you need to know. First, you will need to purchase the parts needed for the installation. Second, you will need to remove the old exhaust system. Third, you will need to install the new exhaust system.
The parts you will need for the installation include: two exhaust pipes, two mufflers, two exhaust tips, clamps, and hangers. You will also need a drill, saw, and various other tools.
To remove the old exhaust system, start by disconnecting the exhaust pipes from the mufflers. Then, disconnect the mufflers from the exhaust tips. Next, remove the clamps and hangers. Finally, remove the old exhaust system.
To install the new exhaust system, start by connecting the exhaust pipes to the mufflers. Then, connect the mufflers to the exhaust tips. Next, install the clamps and hangers. Finally, start the drill and saw to cut the new exhaust system to the correct length.
Step 4. Measure and Cut

If you’re looking to give your Chevy truck a little more power and a whole lot more attitude, then installing a dual exhaust system is the way to go. Not only will it make your truck sound more aggressive, but it will also help to improve its performance.
Installing a dual exhaust system is not a difficult task, but there are a few things that you will need to do in order to ensure that it is installed correctly. In this article, we’ll show you how to measure and cut the exhaust pipes for your dual exhaust system so that it will fit perfectly on your truck.
The first thing that you need to do is to measure the length of the existing exhaust system. To do this, simply take a tape measure and measure from the front of the exhaust manifold to the back of the muffler. Once you have the length, you will need to add about 6 inches to account for the new exhaust pipes.
Next, you will need to cut the existing exhaust pipes. To do this, you will need to use a hacksaw or a pipe cutter. If you are using a hacksaw, be sure to use a blade that is designed for cutting metal. Once you have cut the pipes, you will need to remove any burrs or sharp edges with a file or sandpaper.
Now, you will need to install the new exhaust pipes. To do this, you will need to connect the front pipe to the exhaust manifold and the rear pipe to the muffler. Once you have the pipes connected, you will need to weld them in place. If you do not have access to a welder, you can use exhaust sealant or clamps to secure the pipes.
Once the pipes are installed, you will need to install the mufflers. To do this, you will need to connect the inlet pipe to the muffler and the outlet pipe to the tailpipe. Once the mufflers are in place, you will need to weld them in place or use clamps to secure them.
Finally, you will need to install the tips. To do this, you will need to connect the outlet pipe of the muffler to the tip. Once the tips are in place, you will need to weld them or use clamps to secure them.
That’s all there is to it! After following these steps, you will have successfully installed a dual exhaust system on your Chevy truck.
Step 5. Go for a Test Drive

Chevy’s dual exhaust is one of the most unique features of the brand’s vehicles. The system allows drivers to have two different types of exhausts, depending on their needs. The first is a traditional exhaust that runs from the engine to the tailpipe. The second is a performance exhaust that is designed to improve the sound and power of the engine.
The dual exhaust system is a great way to improve the performance of your Chevy. It is also a great way to improve the sound of your engine. If you are looking for a way to make your Chevy sound better, then you should consider a dual exhaust system.
Things to Consider How to Install Dual Exhaust on a Chevy Truck.

First, you will need to determine if your truck has the necessary clearance for the installation. Second, you will need to choose the right size pipes for your truck. Third, you will need to install the mufflers and tips. Finally, you will need to tune the exhaust system.
Type of truck
One of the most popular modifications that truck owners make is to install a dual exhaust system. While the factory-installed single exhaust system is adequate for most driving conditions, many truck enthusiasts feel that a dual exhaust system gives their truck a more powerful look and sound. Installing a dual exhaust system is not a difficult task, but there are a few things that you should know before you get started.
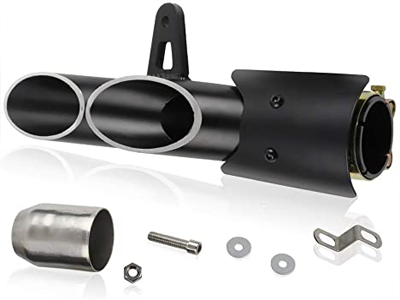
The first thing to consider is what type of dual exhaust system you want to install. There are two basic types of dual exhaust systems: true duals and false duals. True duals have two completely separate exhaust systems, with each system exiting through its own tailpipe. False duals have a single exhaust system that is divided into two sections, with each section exiting through its own tailpipe.
The next thing to consider is what kind of mufflers you want to use. There are many different types and styles of mufflers available, so you should take some time to research the different options before making a decision. You should also consider the type of exhaust tips you want to use. Again, there are many different styles available, so you should take your time to find the ones that you like the best.
Once you have decided on the type of dual exhaust system you want to install and the type of mufflers and exhaust tips you want to use, the actual installation process is relatively simple. If you are not comfortable doing the installation yourself, you can always take your truck to a professional exhaust shop and have them do it for you.
Installing a dual exhaust system is a great way to give your truck a more powerful look and sound. With a little bit of research and planning, the installation process is relatively simple and can be done in a few hours.
Exhaust system
If you want to add a little more power to your car, as well as a nice rumble, you may want to consider installing a dual exhaust system. This type of system is not too difficult to install, but it helps to have some mechanical experience. You will also need to purchase a few supplies and have access to a welder. With a little time and effort, you can have a great sounding car.
The first step is to remove the old exhaust system. This is done by disconnecting the muffler from the exhaust pipe. Next, you will need to remove the hangers that are holding the exhaust pipe in place. Once the old system is removed, you can start installing the new dual exhaust system.
The first step in installing the new system is to weld two new exhaust tips onto the exhaust pipe. Next, you will need to attach the muffler to the exhaust pipe. Once the muffler is in place, you can then attach the hangers to hold the exhaust pipe in place. The last step is to connect the dual exhaust system to the car’s exhaust system.
If you follow these steps, you should have no problem installing a dual exhaust system on your car. This type of system can really add a lot of power to your car, as well as a great sound.
Cost
Adding a dual exhaust system to your Chevy truck can be a great way to improve its performance and style. However, it can also be a significant expense. Here’s a look at the cost of installing a dual exhaust on a Chevy truck.
The cost of the parts for a dual exhaust system will vary depending on the specific parts you choose. Expect to pay anywhere from $200 to $1,000 for the parts alone. In addition, you will also need to pay for labor costs. These will vary depending on the shop you use and the complexity of the installation, but you can expect to pay at least $100 for labor.
Overall, then, you can expect to pay at least $300 to install a dual exhaust system on your Chevy truck. This is a significant investment, but one that can pay off in terms of improved performance and style.
Installation
In this article, we’ll be discussing the installation of a dual exhaust on a Chevy truck. This is a relatively simple process, but there are a few things to keep in mind.
The first thing you’ll need to do is remove the old exhaust system. This can be done by unbolting the muffler and tailpipe from the exhaust manifold. Once the old system is removed, you can begin installing the new dual exhaust.
Start by bolting the new mufflers in place. Then, connect the tailpipes to the mufflers. Once the tailpipes are connected, you can attach them to the exhaust manifold.
Make sure all the bolts are tightened properly, and then start the engine to test the new system. If everything sounds good, you’re all done!
FAQs – Frequently Asked Questions & Answers
1. What is a dual exhaust?
A dual exhaust is an exhaust system with two exhaust pipes instead of one. It is usually found on V8 engines.
2. Why would I want a dual exhaust?
There are a few reasons why you might want a dual exhaust. One reason is that it can improve the performance of your engine by helping it to breathe better. Another reason is that it can make your truck sound more aggressive.
3. How do I install a dual exhaust?
Installing a dual exhaust is not a difficult task, but it is one that is best left to a professional. The reason for this is that you need to make sure that the exhaust pipes are properly aligned and that all of the connections are tight.
4. What are the benefits of a dual exhaust?
There are a few benefits of a dual exhaust. As mentioned above, one benefit is that it can improve the performance of your engine. Another benefit is that it can make your truck sound more aggressive.
5. What Are the Benefits of Dual Exhaust?
6. Are there any drawbacks to a dual exhaust?
The only real drawback to a dual exhaust is the cost. Dual exhaust systems can be quite expensive, so you need to make sure that you really want one before you make the investment.
Final Words
Installing a dual exhaust system on your Chevy truck is a great way to improve its performance and style. This modification is relatively easy to do and can be completed in a few hours. You will need to purchase a few parts and have basic welding skills to complete this project. Once you have installed your new dual exhaust system, you will notice an immediate difference in the way your truck sounds and performs.